If you have a global css file, where you declare the variables like colors, font-sizes etc and which is imported at all the places in your other css or sass file make sure that you do not have any css classes defined in that global file.
For Eg:
Your Global.scss file has these contents where you have defined the application variables in sass.
When you build your application the above file would produce a CSS like this.
body {
height:100%;
}
@font-face {
font-family: ‘Times New Roman’, sans-serif;
}
.className {
color:#4A4A4A;
font-size: 20px;
margin-top: 10px;
}
You see that css definitions defined in the global file is also imported into the test.scss file.
If you start including the Global.scss files into every file, it will import the css definitions in all those files. Hence, your bundle in the end will have duplications of css defintions.
How to solve this ?
The better way to solve this is to import the Global.scsswhich contains the css definitionsinside your application entrypoint only once. For example, in your index.js or app.js. This will ensure that the global.scss file is available to all the other sub files or to the entire application.
You can still import the Global.scss files into all the scss files, but it is necessary to ensure that the Global.scss file should just contain the sass variables or mixins. The sass builder will snot include the mixins into the final bundle and hence there is no duplications.
Elasticsearch is one of the best search engine which helps to setup a search functionality in no time.
The building blocks of any searchengine are tokenizers, token-filters and analyzers. It’s the way the data is processed and stored by the search engine so that it can easily look up. Let’s look at how the tokenizers, analyzers and token filters work and how they can be combined together for building a powerful searchengine using Elasticsearch.
Tokenizers
Tokenization is a process of breaking the strings into sections of strings or terms called tokens based on a certain rule.
Example:
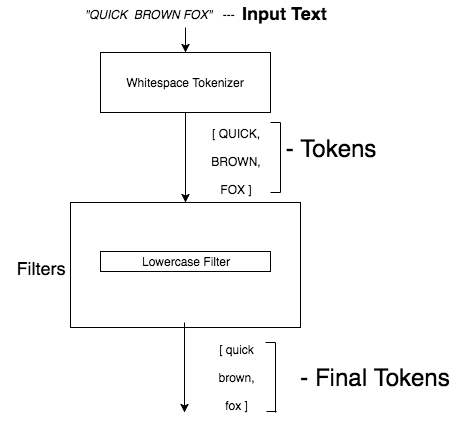
Whitespace tokenizer :
This tokenizer takes the string and breaks the string based on whitespace.
Input => “quick brown fox”
Output => [quick, brown, fox]
There are numerous tokenizers available which does the tokenization and helps to break the large data into individual chunk of word (known as tokens) and store them for searching.
Other examples of tokenizers.
Letter tokenizer:
Tokenizer which breaks the strings when it encounters anything but a letter.
Ex:
Input => “quick 2 brown’s fox ”
Output => [quick,brown,s,fox]
It keeps only letters and removes any special characters or numbers.
Token Filters:
Token filters operate on tokens produced from tokenizers and modify the tokens accordingly.
Example Filters:
Lowercase filter : Lower case filter takes in any token and converts it to lowercase token.
Ex:
Input => “QuicK”
Output => “quick”
Stemmer filter: Stems the words based on certain rules. The stemmer filter can be configured based on many stemmer algorithms available. You can take a look at the different stemmer available here.
Ex1:
Input => “running”
Output => “run”
Ex2:
Input => “shoes”
Output => “shoe”
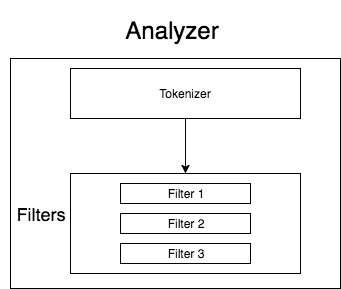
Analyzer:
Analyzer is a combination of tokenizer and filters that can be applied to any field for analyzing in elasticsearch. There are already built in analyzers available in Elasticsearch.
Analyzer Representation
Some of the built in analyzers in Elasticsearch:
1.) Standard Analyzer: Standard analyzer is the most commonly used analyzer and it divides the text based based on word boundaries defined by the Unicode Text Segmentation algorithm. It also eliminates all the punctuation, lowercase terms and stopwords.
Ex:
Input => “The 2 QUICK Brown-Foxes jumped over the lazy dog’s bone.”
NOTE: It will remove all the punctuations , numbers and stopwords like (the, s).
2) Whitespace Analyzer: Whitespace analyzer divides the text based on the whitespace character. Whitespace analyzer internally uses the whitespace tokenizer to split the data.
Ex:
Input => “quick brown fox”
Output => [quick, brown, fox]
Custom Analyzer:
As mentioned earlier the analyzer is a combination of tokenizer and filters. You can define your own analyzer based on your needs from the list of available tokenizers and filters.
Let’s look at the ways to define the custom analyzer in Elasticsearch.
"analyzer": {
 "my_custom_analyzer": {
  "type": "custom", // Define the type as custom analyzer
  "tokenizer": "standard", //Define the tokenizer
   "filter": ["uppercase"] // Define the toke Filter
 }
}
The above analyzer is a custom analyzer with the below settings.
name – my_custom_analyzer tokenizer – standard filter – uppercase
Working of the above analyzer:
Input => “Quick Brown Fox”
Output => [QUICK, BROWN, FOX]
Take a look at the below diagram to understand how the data is processed by any analyzer.
Input => Good weekend 🙂
Output => [good, weekend, happy]
Input => Pride & Prejudice
Output => [Pride, and, Prejudice]
NOTE: Notice that we used char_filter instead of token_filter here. The reason is the char_filter runs before the tokenizer and hence it prevents the special character like smileys and ampersand characters from being removed. It replaces the special characters with the given mappings and prevents from elemeniation of special characters. We can also use whitespace tokenizer to preserve the special character and remove it in token filter later.
Thus you can configure your custom analyzers according to your needs and use it for search to obtain better results. The analyzers you can configure are plenty and should be configured wisely based on your data feeds.
Promise.race(): Yes, there exists a function called Promise.race() ,if you have never heard of or never used it before, lets try to understand what Promise.race() actually is ?
Promise.race() accepts a iterable Promises and returns a new Promise which resolves as soon as one of the Promises passed to it resolves. The returned Promise will contain a value for the first Promise that got resolved. Lets understand it thorough few examples.
Example 1 :
var promise1 = Promise.resolve('a');
var promise2 = Promise.resolve('b');
var resolvedPromise = Promise.race([promise1,promise2]);
resolvedPromise.then((data) => {
  console.log('Resolved Promise data: ', data); // This prints ['a'];
});
In the above code promise1 resolved first and hence the resultant promise has value a passed to it. Its used during race conditions where any one of the promises resolves then return it.
Example 2 :
var promise1 = new Promise(function(resolve, reject) {
                 setTimeout(resolve, 500, 'a');
              });
var promise2 = new Promise(function(resolve, reject) {
               setTimeout(resolve, 800, 'b');
   });
var resolvedPromise = Promise.race([promise1,promise2]);
resolvedPromise.then((data) => {
  console.log('Resolved Promise data: ', data); // This prints ['a'];
});
In the above example the promise 1 and promise 2 resolves after setTimeout asynchronously. Hence, based on the time promise1 resolves first because of the 500ms compared to promise2 which resolves after 800ms. Therefore the Promise.race() will give back a promise that will contain data of promise1 i.e value 'a'.
Now, you know how to use Promise.race() function use it wisely :).
You might have heard or used Promise.resolve() and Promise.reject() all the time but there is one more method of Promise that you may have rarely used. That is Promise.all() .We will see how to use this method of Promise and few examples related to this method.
Promise.all() :
This method accepts iterable object of promises and resolves all the promises. The returned promise has an array containing allthe values of the resolved promises that is passed.
If any of the iterable promise is rejected then the Promise.all() rejects otherwise it fulfills all the promises and returns an array.
Lets look at few examples of Promise.all() and understand it better.
Example 1 :
var promise1 = Promise.resolve('a');
var promise2 = Promise.resolve('b');
var resolvedPromise = Promise.all([promise1,promise2]);
resolvedPromise.then((data) => {
  console.log(data); // This prints ['a','b'];
});
The above example is one way of using the Promise.all(). It takes array of 2 promises promise1 and promise2 and resolves both and returns a new promise. If you print the data returned by the Promise.all() you will see an array which contains the values resolved by promise1 and promise2. In the above example values ['a','b'] is printed.
Example 2 :
var promise1 = Promise.resolve('a');
var promise2 = Promise.reject('b');
var resolvedPromise = Promise.all([promise1,promise2]);
resolvedPromise.then((data) => {
  console.log(data);  // It never gets resolved and hence this is not printed
}).catch((error) => {
  console.log(error); // Prints value b. Which is rejected by promise2
});
In the above example Promise.all() took an array of promises where one resolves and other rejects. Promise.all() always rejects if one of the promise that is passed gets rejected.
You need to be careful while using Promise.all(). It needs to be used in a context where you need to show an error if any of the promise rejects. This is not the case always during application development. You don want to see error everywhere in the page just because one of the promise got rejected.
Example 3 :
var promise1 = Promise.resolve('a');
var resolvedPromise = Promise.all([promise1,'b']); // Passing a non promise value
resolvedPromise.then((data) => {
  console.log(data);  // Prints a,b
})
In the above example we passed the non promise value to Promise.all(). We just passed character 'b' to the Promise.all() function. The value will be just added to the resolved promise and still be present in the array. Usually the value is ignored and its not evaluated but its returned in the Promise rather than omitting it.
var is used for global declaration and its scoped to the nearest function block.
Eg 1 :
var a = 10; // its a global declaration and its available everywhere.
Eg 2 :
function mytest() {
  var a= 10;
  if(a==10){
    var a =20;  // its the same variable a that is being modified
    console.log(a); // prints 20
  }
  console.log(a); // prints 20 here too because the
                  //value a is scoped to nearest function mytest.
}
Eg 3: Lets consider this function. And guess the output of the below function.
function mytest() {
  for(var i=0; i<5 ;i++){
   setTimeout(function() {
    console.log(i); // what is the result of this?
   },100);
  }
}
You would expect the result to be 0, 1, 2, 3, 4 but if you run this program the result you would see is 5, 5, 5, 5, 5. The reason behind this is same , the var is functionally scoped and not to the nearest enclosing block. So, there is only one instance of i and the same reference is modified each time.
Eg 4:
function mytest() {
 if(true) {
   var a =20;
 }
 console.log(a); // prints 20. Though a is defined inside if block the
                 //variable a is confined to mytest block.
}
let : let is scoped to the nearest enclosing block i.e within the brackets { } it's defined in.
lets see few examples here.
Eg 1 :
let a = 10; // its similar to var when defined globally and available everwhere.
Eg 2 :
function mytest() {
  let a= 10;
  if(a==10){
    let a =20;  // its the new instance
    console.log(a); // prints 20 a is scoped to nearest block i.e if block
  }
  console.log(a); // unlike var it value a prints 10
                  //value a is scoped to nearest block i.e mytest block
}
Eg 3:
function mytest() {
  for(let i=0; i<5 ;i++){
   setTimeout(function() {
    console.log(i); // what is the result of this?
   },100);
  }
}
The result of the above function is 0,1,2,3,4unlike var which print 5,5,5,5,5.
Eg 4:
function mytest() {
 if(true) {
   let a =20;
 }
 console.log(a); // undefined will be printed since the
                 // value of a is confined to just the if block.
}
Now you know the major difference between var and let. Its recommended to use let because its helpful for garbage collection so that the variables which goes out of scope can be cleaned up. In case of var the variable is always available until you close the window and the space is not cleaned up for other processes.
Const :
Const as the name suggests its used to initialise a constant.
Once declared its value cannot be changed.
Const always requires an initialiser.
Like let const is scoped to its nearest enclosing block.
Lets take a look at few examples.
Eg 1 :
const a; // This is an invalid declaration as there is no initialiser.
const a = 10; // this is a valid declaration and if declared outside
              // its global declaration and its value cannot be changed.
Eg 2 :
function mytest() {
 const a= 10;
 if(a==10){
   const a = 20; // its the new instance
   console.log(a); // prints 20 , a is scoped to nearest block i.e if block
 }
 console.log(a); //  prints 10.
}
Eg 3 :
function mytest() {
 const a= 10;
 a = 20; // Throws an error saying a is read only.
         //The value cannot be changed once initialised.
}
Map-reduce is a programming model that helps to do operations on big data in parallel to achieve faster results. To understand map reduce go through this article which has a nice explanation for beginners.
MongoDB supports map-reduce to operate on huge data sets to get the desired results in much faster way. So, map reduce has two main functions which is a map function which groups all the data based on the key value (go through the article mentioned above to understand what is key.) and a reduce function which performs operation on the mapped data. So, the data is independently mapped and reduced in different shards and then combined together again by map function and finally reduced to give a single result. Map-reduce function is performed on the data independently and in parallel. So, you should be very careful with your reduce function so that it can perform operation independently.
Lets look at an example and solve the problem using map-reduce. For simplicity lets take the data mentioned in the article mentioned above.
Here is the problem statement. There is list of cities with temperature, the goal is to find the maximum temperature for each city. This can be easily done using mongodb aggregation framework. But lets solve this problem using map-reduce now and look at the advantages later.
As informed before we need two function i.e mapper function and reduce function. Mongodb can interpret java-script and you must write the functions in JavaScript.
Now Lets look at the mapping function.
Mapper Function
function()
  {
     emit(this.city, this.temperature) //Emits the city and temperature
  };
The above function runs for each and every document in the collection where you run the map reduce, in our case it is cities collection. For every document it emitscityas key and temparature as values. The mapping function basically emits a key and a value pair . In our case it is
“New York” => 22
“New York” => 18
“New York” => 14
“Toronto” => 20
“Toronto” => 4
“Rome” => 32
“Rome” => 33
The data i.e is emitted by the mapper function is grouped and passed to reduce function to operate on the values. The grouped data looks like this.
New York” => [22, 18, 14]
“Toronto” => [20, 4]
“Rome” => [32, 33]
Reduce Function:
 function(key, values) {
   return Math.max.apply(Math, values); // javascript syntax to find  the max values in an array.
}
So the reduce function takes two parameters the key and the grouped values that are produced by mapping function , performs an operation and returns a single value.
In our case the reduce function has to find the maximum temperature for each city. So the reduce function runs on the grouped data.
So lets see how it works for our example.
Our reduce function takes ‘New York’ and [22,18,14] as parameters. It performs operations on the values and returns the maximum value in the array. In this case it is 22.
Similarly, for “Toronto” => [20, 4] ,the maximum value is 20 and that is returned from the reduce function.
P.S : The above explanation makes you understand how the mapper and reduce function works. But, internally the mapper function and reduce functions are called repeatedly and not just once for every key and values. That is emit function may just emit just 2 values for New York in the beginning. .i.e [ 18, 14 ] and then reduce function reduces and gives the maximum value 18 which is again called by mapper function and when it encounters another document with the same key i.e 22 , it groups 18 and 22 together [18,22]. Again passed to reduce function and you get 22 as the result. which is the final value. So, by breaking the operations still you achieved the same result and with better performance. The data can be split and operated on independently in many threads or in many machines and achieve much faster results.
So, now that you have mapper function and reduce function lets run the map reduce command and check the results. Mongodb map-reduce command will output the result to a new collection rather than printing it to the console. So, you need to specify the output collection for it to dump the results. In my example I am dumping it to a collection called maxTemp.
Finally we have the maximum temperature calculated for every city .
When to use map-reduce ?
Map reduce should be used when your aggregation query is slow and taking longer time to execute because of huge amount of data in the DB. Map-reduce can run parallel and can perform operations at much higher rate.
If the data is less its better to stick to aggregate queries as map reduce takes longer exexcution times compared to aggregate queries when data set is low. And the effort required is more compared to aggregate queries.
Your map-reduce function should be written in such a way that it can run parallel with i.e map and reduce and still give the correct result.
You can check mongodb docs for more options and use it in your map reduce query. Here is the linkfor the same.
Note : Implementation of the same using Java is available hereon github. Check it out .
Let’s try to build a simple spell corrector using elasticsearch.
It is a very common behaviour for users to make typos, while they are searching in the web applications. If your web application implements search, then it must detect the typos during search and it should try to correct or suggest the correct words. So, how can you achieve this? Elasticsearch’s term_suggester to the rescue.
Let’s see how term_suggester solves our problem. Elasticsearch’s term suggester uses the edit distance algorithm to detect the closest correct word and suggest those closest words as a replacement for the wrongly-spelled word. So, how does it know which word is the correct word for suggesting? It actually depends on the data you have indexed into elasticsearch. So, if it finds any closest word in your data then it tries to suggest as an alternative to the misspelled word.
NOTE: If there is no data in your index, elasticsearch itself cannot suggest you any words. It tries to predict words based on the data-set present in your index.
Now, let’s try to implement this.
First, let’s insert the setting and mapping for indexing data into Elasticsearch.
We created an index test with a mapping called data. And we defined a field with the name my_field which can store text.
Let’s insert some data into our index. I made a quick search in google for commonly misspelled words , I took few of them and indexed the data into our index.
PUT test/data/1 { "my_field":"disappoint" }

PUT test/data/2
{
 "my_field":"ecstasy"
}

PUT test/data/3
{
 "my_field":"embarass"
}
Now we have inserted the data. Let’s try to search using wrong spellings.
We searched for “dissapoint” i.e wrongly spelled word and we get no results. When you do not get any result for your search then you can always assume that there might be spelling mistake from the user and you can use term_suggester to suggest new words for your users.
The above snippet is used to suggest terms that are closely related. Here I asked the term_suggester to suggest new words that are closely related to misspelled word “dissappoint” , I called my suggester mytermsuggester(you can name it anything) and i am telling suggester to suggest from the field my_field. Now, lets see the result of the above query.
Aha! we got the word disappoint as a suggestion and it is present in our index. Now, you can suggest your user with this new word or you can correct the word yourself and show the results for corrected word. The result contains score and freq along with the word. Score is calculated based on number of occurrences of that word in the index and also how important is that word to your index. Freq is the number of times the word occurs in your index.
There are lots of other options available to use with the term_suggest query and you can refer to elasticsearch documentation here for the same. But some of the important ones are
min_doc_freq – Minimum no of times the word should occur in your documents to be suggested. For suppose the value is 5 then the word has to occur in 5 different documents.
max_term_freq – The minimum number of times the word should occur in your index irrespective of documents. i.e if 5 times the word is present in one document also it is suggested.
sort – sort the suggested words based on score or freq. If the value is score then sort bases on scores, if value is freq then it sorts the words based on frequency.
I was using Elasticsearch for search and there was this specific problem I encountered in one of the applications I was working on. So, the problem was, there are numerous words in English that are two different words and can appear as single word in some context.
For Eg: New York can appear as newyork or new york. Suppose you have dataset which contains newyork (without space) and when you search for new york(with space) , you will end up not getting any results for the search you made.
In order to solve this problem we can make use of elasticsearch tokenizers and filters.
So lets solve the problem. Elasticsearch settings consists of 3 main components i.e analyzers, filters , tokenizers and other index related settings.
Lets create a setting that is required for our search. We are now creating a custom analyzer that can be mapped to our field while creating mappings for our index.
So, the trick here is with the custom_shingle and my_char_filter.
Shingle filter gives the combination of words and my_char_filter will remove the space between the shingles and hence gives back a single word. Lets analyze what our custom analyzer bigram_combiner does.
POST test/_analyze
{
 "analyzer": "bigram_combiner",
 "text": "new york"
}
So, if we use bigram_combiner as analyzer for our field we will accomplish what we need. It breaks down the words into 3 combinations. So, new york is now analyzed as three words : new, york and newyork
Now searching the field for new york or newyork yields you back the result you wanted.
Lets see how to use this analyzer in our index. Now you have inserted the above settings lets insert the mappings for the same. We will create a mapping for the index with the name cities and a field called city, which uses the analyzer bigram_combiner.
Finally, we achieved what we wanted. We searched for newyork without spaces and yet we got back the result which contained new york as two separate words.
We achieved this just by using the combination of filters and analyzers. Elasticsearch filters and tokenizers gives you more power to search differently if used in combinations. There are lots of other filters available in ES which you can refer to in the elasticsearch documentation.
Now be careful when you are using this settings for your data as this produces combination of all the words, if there are more than two words then it will consume more memory for building your index. Hope this is helpful.
Want more help in configuring Elasticsearch ? just shoot a mail @ mallikarjunajs.27@gmail.com.